How to create a secure login system with php and mysql
- Jun 09, 2023
- ·
- 7 min read
- ·
- 480 Views
A login system allows a user to gain access to an application by entering their credentials for example email, phone number, username and password. It is used by websites and applications as a security measure designed to prevent unauthorized access to confidential data. When a user provides a combination of credentials that does not match a user account, access is denied.
In this guide, you will learn how to create a powerful and secure login system with PHP and MySQL! We will cover all basic features of a login system namely: registration, login, Profile, remember me, account activation, validation, and password management. This tutorial is comprised of five parts:
- Part 1 - Creating the Registration System
- Part 2 - Building the Login System
- Part 3 - Implementing the remember me feature
- Part 4 - Adding the Account Activation feature
- Part 5 - Adding the Password Reset Feature
Building the Registration System
In this section we'll build a registration system that allows users to create a new account by filling out a web form.
:contents:
Requirements
- Local web server (XAMPP) - XAMPP is the most popular PHP development environment. It is a free and open-source cross-platform web server solution stack package developed by Apache Friends, consisting mainly of the Apache HTTP Server, MariaDB database, and interpreters for scripts written in the PHP and Perl programming languages.
- A code editor - A code editor is a text editor program designed specifically for editing source code of computer programs. I recommend sublime text 3 because it’s lightweight and speedy.
What you will learn in this tutorial
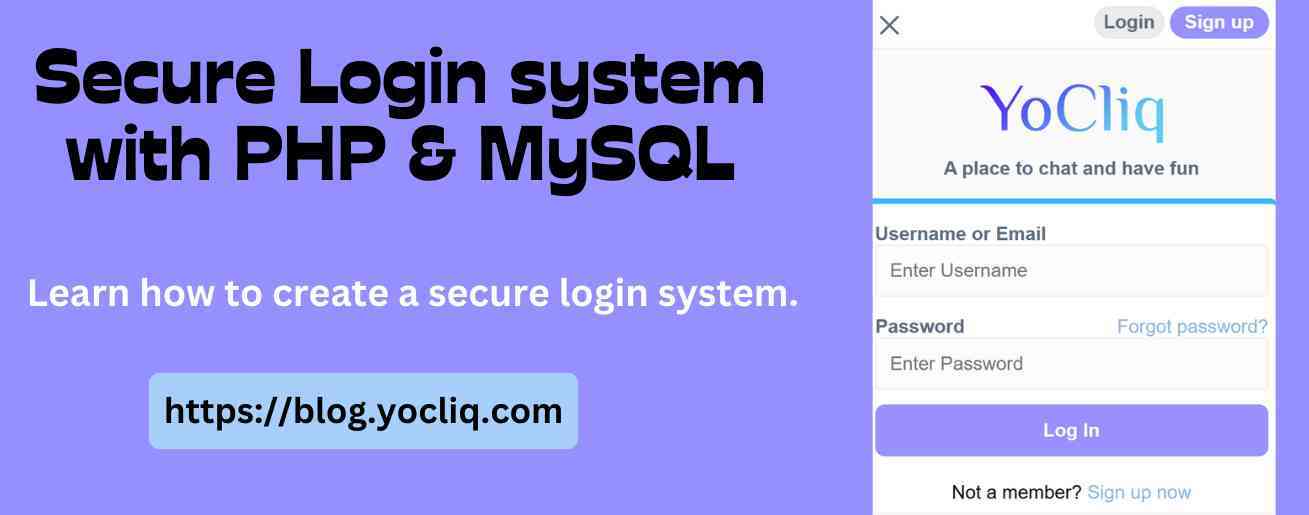
- Form design – designing a unique and beautiful login form with HTML and CSS3.
- Sql prepared statements - A prepared statement is a feature used to execute the same (or similar) SQL statements repeatedly with high efficiency. Prepared statements are secure and very useful against SQL injections.
- Form validation - a “technical process where a web-form checks if the information provided by a user (username, email, password etc.) is correct.” The form will either alert the user that they messed up and need to fix something to proceed, or the form will be validated and the user will be able to continue with their registration process.
- Sessions - A session is a way to store information (in variables) to be used across multiple pages.
- Database creation and connection
1. Create a database and database table
1.1 Database Creation
- Login to PHPMyAdmin
- Click on database tab to create a new database
- Enter "login_system" as your database name and click on create database button
Alternatively you can execute the query below to create a database:
CREATE DATABASE login_system;1.2 Creating accounts table
In the login_system database, create a table accounts. Click the database on the left side panel (login_system) and execute the following SQL statement:
CREATE TABLE `accounts` (
  `id` int(11) NOT NULL,
  `username` varchar(100) NOT NULL,
  `email` varchar(200) NOT NULL,
  `dob` date NOT NULL,
  `gender` char(1) NOT NULL,
  `password` varchar(255) NOT NULL,
  `member_since` datetime NOT NULL DEFAULT current_timestamp()
) ENGINE=InnoDB DEFAULT CHARSET=utf8mb4 COLLATE=utf8mb4_general_ci;
On phpMyAdmin this should look like:
:img1:
2.0 File Structure
Now create a folder called loginsystem in a directory accessible to our server. i.e create the folder inside htdocs (if you are using XAMPP server) or inside www (if you are using wampp server).
Inside the folder loginsystem, create the following files:
:img2:
So first, in the root of the loginsystem folder create a new folder called assets. Inside the classes folder we need to create three files–
- config.php
- functions.php
- validate.php
- alert.php
- styles.css
2.1. Creating the config file
config.php is for making the database connection. Let's create this file and put the following code inside it.
<?php
//Initialize session
session_start();
session_regenerate_id();

/*connect to database. Assuming you are running MySQL
server with default setting (user 'root' with no password) */
define('DB_HOST', 'localhost');
define('DB_USERNAME', 'root');
define('DB_PASSWORD', '');
define('DB_NAME', 'phplogin');

/* Attempt to connect to MySQL database */
$conn = new mysqli(DB_HOST, DB_USERNAME, DB_PASSWORD, DB_NAME);

// Check database connection
if($conn === false){
  die("ERROR: Could not connect. " . $conn->connect_error);
}

define('ROOT_PATH', $_SERVER["DOCUMENT_ROOT"] . '/tutorials/loginsystem');
$lINk = (isset($_SERVER['HTTPS']) && $_SERVER['HTTPS'] === "on" ? "https" : "http") . "://" . $_SERVER['HTTP_HOST'];
define('BASE_URL', ''.$lINk.'/tutorials/loginsystem');

// Define variables and initialize with empty values
$username = $email = $gender = $pwd = $pwd1 = $pwd2 = "";
//check current date
$now = date("Y-m-d H:i:s");

include (ROOT_PATH . "/assets/functions.php");
include (ROOT_PATH . "/assets/validate.php");
2.2 Creating the functions file
functions.php contains reuable codes, which means we don't have to write the same code again. Let's create this file and put the following code inside it.
<?php
function secureSelect($conn, $sql, $params = [], $types = "") {
  return secureQuery($conn, $sql, $params, $types)->get_result();
}

function secureQuery($conn, $sql, $params, $types = ""){
  $types = $types ?: str_repeat("s", count($params));
  $stmt = $conn->prepare($sql);
  $stmt->bind_param($types, ...$params);
  $stmt->execute();
  return $stmt;
}

function createAccount($conn,$username,$email,$gender,$dob,$pwd) {
  $sql = "INSERT INTO accounts (username,email,gender,dob,password) VALUES (?,?,?,?,?)";
  $insert = secureQuery($conn, $sql, [$username,$email,$gender,$dob,$pwd]);
  $userID = $conn->insert_id;
  $_SESSION['id'] = $userID;
  $_SESSION['successMSG'] = "Account created successfully! Welcome to YoCliq.";
  rdr('home.php');
}

function getUserRow($conn, $var, $row){
  $u = secureSelect($conn, "SELECT * FROM accounts WHERE $var=? LIMIT 1",[$row])->fetch_assoc();
  if(!empty($u['id'])){
    return $u;
  } else {
    return null;
  }
}

function validateDOB($date){
  $matches = array();
  $pattern = '/^([0-9]{1,2})\\/([0-9]{1,2})\\/([0-9]{4})$/';
  if(!preg_match($pattern, $date,$matches)) return false;
  if(!checkdate($matches[2], $matches[1], $matches[3])) return false;
  return true;
}

function pureStr($value){
  $value = trim($value);
  $value = stripslashes($value);
  $value = htmlspecialchars($value);
  return $value;
}

function rdr($page){
  header("Location: ".(BASE_URL . "/$page")."");
  exit();
}
2.3 Creating the validation file
The validate.php will handle all the validation of all the user inputs to avoid unnecessary errors. Let's create this file and put the following code inside it.
fetch_assoc();
    if (!empty($user['username'])) {
      if (password_verify($pwd, $user['password'])) {
        $_SESSION['id'] = $user['id'];
        $_SESSION['successMSG'] = "Logged in successfully";
        rdr("home.php");
      } else {
        $err2= "Incorrect password";
      }
    } else {
      $err1 = "Username or email address not found. Check your details and try again!";
    }
  }
}

//Account creation
if (isset($_POST['signup'])) {
  $username = pureStr($_POST["username"]);
  $email = pureStr($_POST["email"]);
  $dob = pureStr($_POST['day'] .'/'. $_POST['month'] .'/'. $_POST['year']);
  $pwd1 = pureStr($_POST["pwd1"]);
  $pwd2 = pureStr($_POST["pwd2"]);

//username validation
  $nameCheck = getUserRow($conn, "username", $username);
  if(empty($username)) {
    $err1 = "Please enter a username.";
  } elseif(preg_match('/[^A-Za-z0-9_]/', $username)){
    $err1 = "Username can only contain alphanumeric characters(letters A-Z, numbers 0-9) and underscores(_).";
  } elseif(strlen($username) > 15 || strlen($username) < 3){
    $err1 = "Username length should be between than 4 and 15 characters.";
  } elseif(!empty($nameCheck["username"])) {
    $err1 = "Username is already taken!";
  }

  //email address validation
  $mailCheck = getUserRow($conn, "email", $email);
  $atPos = mb_strpos($email, '@');
  $mailDomain = mb_substr($email, $atPos + 1);
  if (!filter_var($email, FILTER_VALIDATE_EMAIL)) {
    $err2 = "Enter a valid email address.";
  }  elseif(!empty($mailCheck["email"])) {
    $err2 = "Email is already registered!";
  } elseif (!checkdnsrr($mailDomain . '.', 'MX')) {
    $err2 = 'Domain "' . $mailDomain . '" is not valid';
  } elseif (empty($email)) {
    $err2 = "Email required.";
  }

  //date of birth validation
  if(!validateDOB($dob)){
    $err3 = "Enter a valid date of birth";
  } else {
    $birthday = pureStr($_POST['year'] .'-'. $_POST['month'] .'-'. $_POST['day']);
  }

  //gender validation
  if(!empty($_POST['gender'])) {
      $gender = pureStr($_POST["gender"]);
  } else {
    $err4 = "Please select your gender";
  }

  //password validation
  if(empty($pwd1)){
    $err5 = "Please enter a password.";
  } elseif(strlen($pwd1) < 6){
    $err5 = "Password must have atleast 6 characters.";
  }

  if(empty($pwd2)){
    $err6 = "Please confirm password.";
  } elseif(empty($err5) && empty($err6) && ($pwd1 != $pwd2)){
      $err6 = "Passwords did not match. Try again!";
    }

  //if no errors, continue to create account
  if(empty($err1) && empty($err2) && empty($err3) && empty($err4) && empty($err5) && empty($err6)) {
    $hashedPwd = password_hash($pwd1, PASSWORD_DEFAULT);
    $create = createAccount($conn,$username,$email,$gender,$birthday,$hashedPwd);
  }
}
2.4 Creating the alert file
The alert.php will display all the validation errors in order to notify the user what to do. Let's create this file and put the following code inside it.
2.5 Creating the registration form design
Let’s create a PHP file called register.php and put the code below in it. This code will create a web form that allows a user to register themselves.

